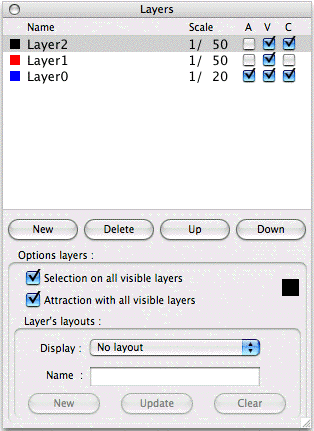
In this example, we are in “Plan” and we have 3 layers.
One
creates a new layer while clicking on the “New” button and one removes
them while clicking on the button “Delete” after having selected a
layer.
The suppression also acts on a layer having of the objects and destroyed of course the objects present on the layer.
Each layer has a name, by defect Layer0 then 1,… but that one can modify by clicking above 2 times to pass in edition.
Each layer has also a scale of drawing “Scale” which one can also modify in the same way that the name.
This
scale is the scale by defect which will be used for the drawing of the
objects on the layer. If one changes this scale after having to create
objects, they will not be modified. In spite of this scale by defect,
one can individually assign a scale different to an object via the
pallet from edition. But it is simpler to create a new layer with this
different scale and to create the objects with this scale on this layer.
A layer is active, that on which will be created the objects, box notched in column A (Activ).
Each layer can be visible or not, box notched or not in the column V (Visible).
Each
layer can be seen allotting a color by defect, box notched in the
column C. All the objects of the layer will be automatically drawn with
this color. That makes it possible to visualize well on which layer
each object is drawn. The objects already present on the layer will
change color.
To modify the color owing to lack of a layer, you must
select it while clicking on its line, here Layer2 is selected. Thus
RealCADD posts a rectangle of the color by defect of the layer under
the button “Down”. By keeping the button of the mouse supported on this
rectangle, you ridges to appear the pallet of choice of color. It is
enough to release the button of the mouse when the cursor is on the
desired color.
You can change the hierarchy of the layers with the
buttons “Up” and “Down” or with the mouse into “taking” a layer in the
list and by changing it place.
This hierarchy can especially affect
your drawing with the objects having back color since they can hide
objects of a lower layer.
You can also choose if the selections will
be done on all the visible layers, Option “Selection on all the visible
layers” notched, or only on the active layer, Option “Selection on all
the visible layers” not notched and the same for attractions with the
option “Attraction with all the visible layers”.
You have then the zone of management of the configurations of layers: Layer's layouts
A
layer's layouts enables you to define among all the layers of your
file, that which will be active by defect and those which will be
visible.
You can thus with only one file have several drawings. That is interesting if several layers are common.
For example, with the same file you can manage a plan of architect and the associated plan of electricity.
For that, suffisament break up your drawing into layers, at least 3 for this example.
A layer “bases” for all the objects common to both drawings.
A second, “archi”, for the objects specific to the plan of architect.
And a third, “electricity”, for those specific to the plan of electricity.
Create
2 layouts: For that, make the layers “bases” and “archi' visible
and the layer “electricity” invisible, type “plan archi” in the
editfield “Name” of the “Layer's layouts” then click on “New”. The
first layout is created. Now make the layer “archi” invisible and
the layer “electricity” visible, type “plan elec” in the editfield
“Name” then click on “New”. Your second layout is created. Use the
local menu opposite “Display : ” to pass from one to the other.
The interest of this device is that the modifications made to the layer “base” are reflected on your 2 plans, archi. and elec.
The
“Update” button, enables you to update a layout if you wish to
modify the list of the visible layers or to change the active layer by
defect.
The button “Clear” erases a layout of the list. But not associated layers.
The
decomposition of a drawing in layers can appear constraining at
the beginning but the advantages are numerous. One should not either
fall into opposite excess and to have a too great number of layers
even if RealCADD does not limit this number.
