Menu "Action" - Item "Duplicate and Move..." : To
duplicate and move objects :
|

|
This command and this dialogue make it possible to
carry out multiple duplications with displacements.
Displacements
can be done according to a direction, two directions or in circular, it
is enough to choose the corresponding panel.
Here, the panel “One direction” is active:
One can is to start with displacement “Moves and duplicates” or to start with duplication “Duplicates and moves”.
Then,
it is enough to inform the dialogue by indicating displacement
according to X and following y and the number of duplication in the
field “time.
One can of course carry out only one displacement.
If the button “Again” is notched, the dialogue is displayed again after the operation. So you can do other displacements.
|
Menu "Action" - Item " Rotate..." : To rotate selected
objects :
|

|
With this command and this dialog opposite, you can
rotate selected objects with an angle you enter.
Rectangles and ovals are converted to polygons.
You have the choice to carry out rotation for each object separately or all together.
|
Menu "Action" - Item " Scale..." : - To scale selected
objects :
|

|
With this command and this dialog opposite, you can
scale selected objects with x value and y value.
It
is enough to enter the multiplicative values of X and y, and the
positions and dimensions of the selected objects will be multiplied by
these values.
To reduce the objects, it is enough to enter of the values smaller than 1.
You have the possibility of modifying or not the size of the texts at the same time.
|
Menu "Action" - Item " Parallels..." : To draw parallels
with parameter setting :
|

|
This command causes the display of the dialog
opposite, which makes it possible to define the direction of the
parallels "In/Left " or "Out/Right", their number and their spacing.
The action will apply to all the selected objects.
|
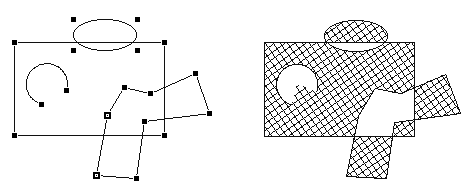
Menu "Action" - Item "Hatch..." : To hatch objects :
|

|
This dialogue makes it possible to define the
hatching, i.e., the angle and the spacing of the lines, and if it is
about a simple or double hatching (perpendicular lines).
According to the modifications of the parameters, the hatching in the square of the dialogue is updated instantaneously.
As for the other objects, you can then change their attributes, thickness, color, dotted.
RealCADD
allows complex hatchings if selected objects overlap. See the example
hereafter, the result is obtained with only one Hatch command.
You can also hatch the surfaces delimited by joined lines. |
Menu "Action" - Item "Textures..." : To fill objects with
texture :
|

|
In RealCADD, textures works like hatch, select objects
to fill, and choose the texture in this dialog.
Fill complex polygons or splines with complex texture can take some seconds.
|
Menu "Action" - Item "Cut lines with objetct..." : To cut
lines with an object :
|

|
This very powerful command makes it possible to cut
and remove the portions of lines interior "Cut and delete
lines in" or external "Cut and delete lines out" with an object
of reference and to prolong the lines on this object, button
"with prolongation" notched.
This command can apply either only to the lines selected, or on all the
lines.
The object of reference is a rectangle, or an oval, or an arc or a
polygon. It must form part of the selection to be selected.
The example below is carried out with the option " Cut and delete lines
in ", " Only selected lines " and the option " with prolongation ".
|
Before
After

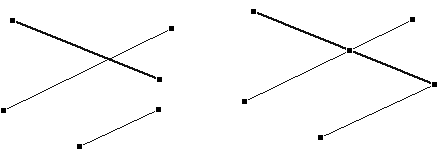
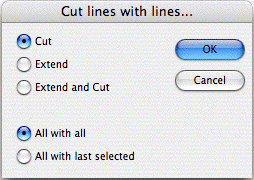
Menu "Action" - Item "Cut lines with lines..." : To cut
lines with lines :
|
|
With this command which acts only on the lines, one
can:
- Cut only.
- Prolong only.
- Cut and prolong.
and do that on :
- all selected lines betwen themselves "All with all".
- or all but only with the last selected "All with last selected".
The lines are only cut with this action.
In the example below, we have doing "Cut and Prolong" and "All with
last selected". The thick line is the last selected.
|
Before
After